From the architect's plan to the input file
David Nortes Martínez and Paulette Kara
plan_to_input_file.RmdBefore starting
Before you start your own model with floodam.building,
you need to make sure that you count on all the information that will be
required:
- The floor plan of the building
- The elevation plan of the building or, at least, the main dimensions (width, height) of the openings and the height from the ground
- The material of walls, floors, ceilings and openings
Ideally, you also have information about the contents of the building and its equipments.
Your first model from scratch
To do this first model we count on the information displayed in the
plans and table below. You have the plan of the house, a focus over each
type of opening and a table summarizing key information. As an extra, we
also include two perspective views so you can have a very clear idea of
the building.
PLANS
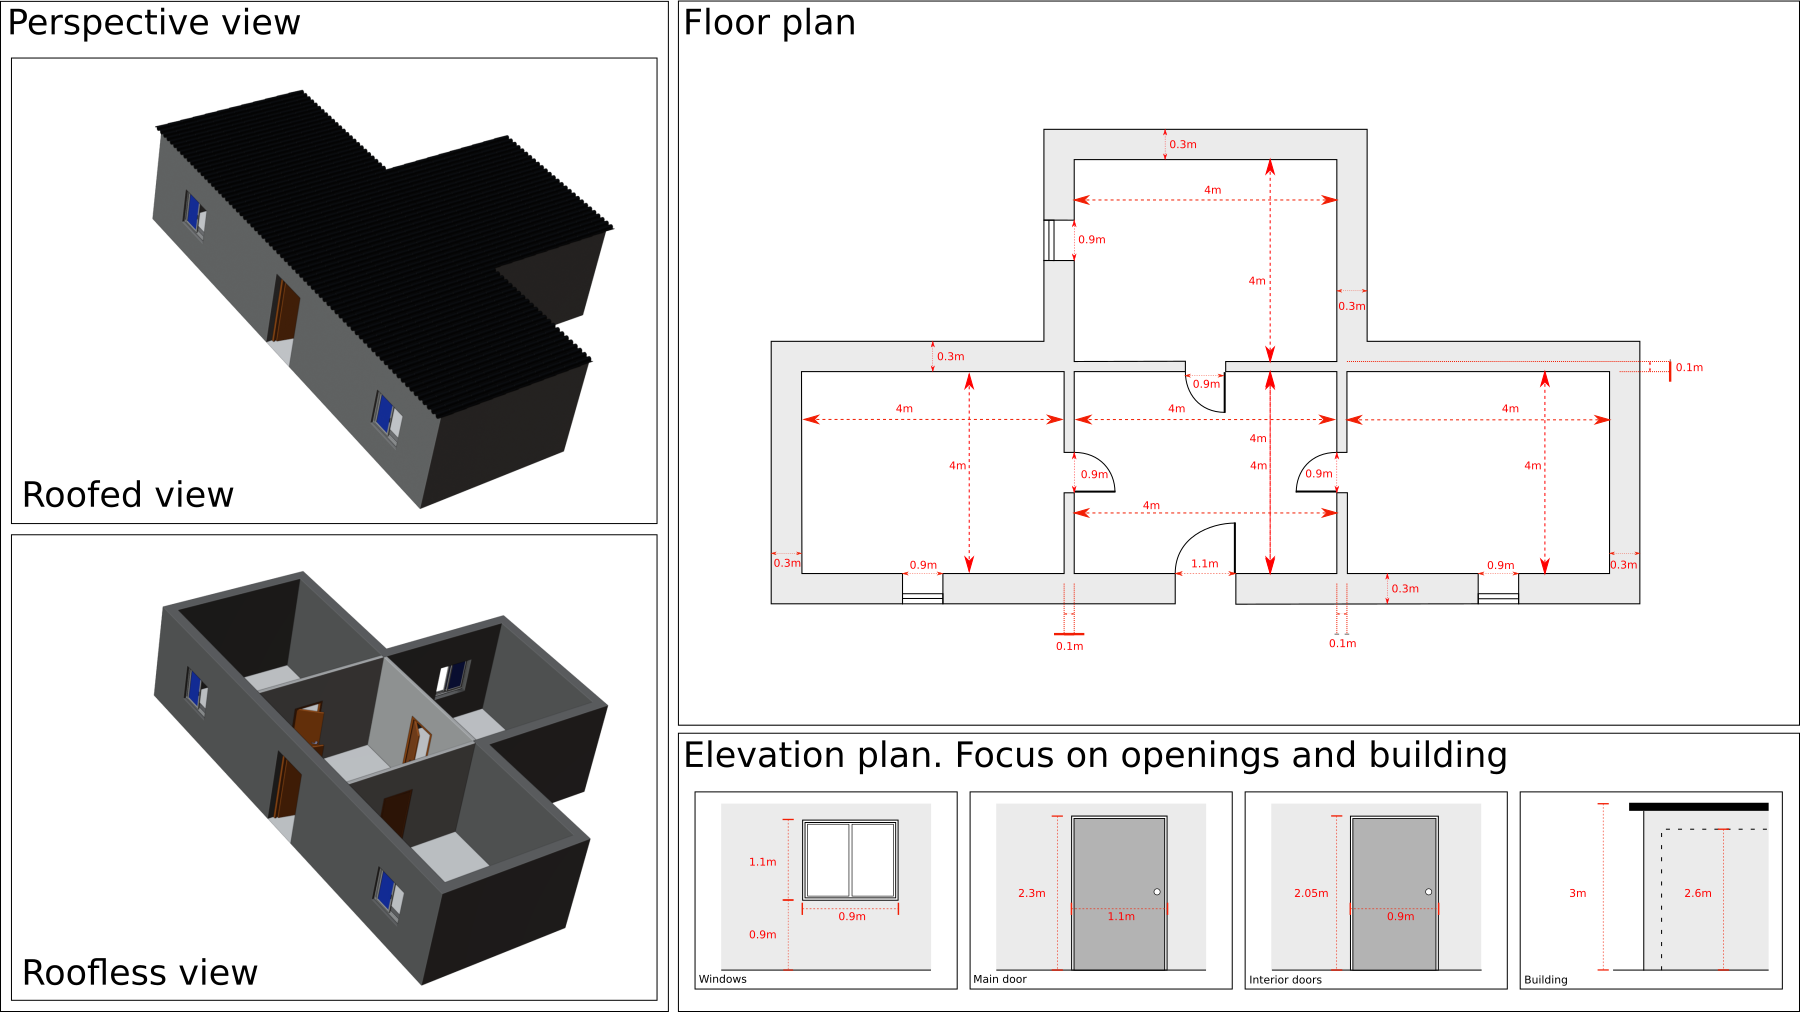
MATERIALS & INFORMATION
| structural group | type of element | material | other information |
|---|---|---|---|
| ceiling | ceiling | concrete | ceiling made of concrete withe cellular plastic insulation and a paint coating |
| floor | floor | concrete | floor covered of glued tiling and wood coverstrips; ground level = street level |
| wall | load bearing wall | concrete | single layer render |
| wall | lining | polyplac | vegetal insulation, paint coating and tile baseboard. Interior face of external walls |
| wall | partition | placostil | paint coating and tile baseboard. Wall used to separate rooms |
| opening | window | pvc | solid PVC shutter |
| opening | interior door | alveolar door with wooden frame | |
| opening | exterior door | solid wood | |
| building | building | main use: dwelling. Thickness of load-bearing walls = 0.3m / Thickness of non-load-bearing walls = 0.1m |
As you can see, we count on:
- The floor plan of the building
- The elevation plan of the building (focus only on areas of interest)
- The material of walls, floors, ceilings and openings
- Other details concerning walls, floors, ceilings and openings
With this information we will be able to write the building file from scratch. If you have not yet read our vignette The structure of the input file of floodam.building, now it is the best time to do so.
Step 1: create your building file
The first thing you need to create your own model is a xml
or yaml file (the choice is yours). To do so, we recommend you
to use the dedicated function of floodam.building
new_model(). The new_model() function creates
a template of the building file either in XML (default) or YAML
in the path of your choice (or in a temporary folder if path is not
specified) and will launch your default text editor to open it, so you
can start right away. You can also specify the text editor in which you
wish to work as long as it is installed in your system (This
functionality is provided by the utils::file.edit()
function. Please visit its documentation page for more details)
library(floodam.building)

#> XML version of the building file using default text editor
create_new_model(input_file = "building")

#> YAML version of the building file using Visual Studio Code as text editor
create_new_model(input_file = "building", type_building = "yaml", editor = "code")

#> YAML version of the building file using RStudio as text editor
create_new_model(input_file = "building", type_building = "yaml", editor = "rstudio")
Depending on the file format of your choice, the template is slightly different due to the different verbosity of the XML and YAML languages.
Step 2: declare the general block
As you have seen in the vignette The structure of the input file of floodam.building, the general block requires five mandatory features. Two of them (dilapidation and version) come prefilled with values by default that we are not going to modify for now. As for the rest of the features, from the information that we have (see plans and table), we know that:
- the building is 3 meters high
- the floor level is located at the street level
- the building is used for housing (dwelling).
The way we should introduce these elements in both XML and YAML formats is detailed below:
XML
<general>
    <type>dwelling</type>
    <H>0</H>
    <height>300</height>
    <dilapidation>0</dilapidation>
    <version>version_02</version>
</general>
YAML
Step 3: declare the element block
Your next step is to declare the element block. Here we are going to declare all the elementary components present in the structure of the building. Please check out the vignette List of building elementary components to have access to all the elementary components available in floodam.building.
Ceiling
According to the data available, we know that:
- The ceilings are made of concrete
- The ceilings are insulated using cellular plastic insulation
- The ceilings are painted
- the ceilings are 2.6 meters high
To declare these elements in our building, we proceed as follows:
- Open the sub-block ceiling
- Declare your element → ceiling_1, in this case
- Declare the material. To do so you should check the elementary components available in the vignette List of building elementary components, section ceilings. In our case, we choose the ceiling_type_concrete component. Please note that, when you declare this component in your input file, the substring ceiling_type_ must be omitted.
- Declare the insulation. Proceed similarly as with the material, but now in section insulatings. In our case, we choose the ceiling_insulating_cellular_plastic. Do not forget to omit the substring ceiling_insulating_ in your declaration.
- Declare your coating (section coatings). Proceed as with material or insulation.
- Declare the ceiling height
The way these elements should be declared in both XML and YAML formats is shown below:
XML
<element>
  <ceiling>
      <ceiling_1>
          <material>concrete</material>
          <insulating>cellular_plastic</insulating>
          <coating>paint</coating>
          <H>260</H>
      </ceiling_1>
  </ceiling>
</element>
YAML
element:
  ceiling:
    ceiling_1:
      material: concrete
      insulating: cellular_plastic
      coating: paint
      H: 260.0
Imagine that one of the rooms would have had a lower ceiling, e.g. 2.1 meters. In that case, you should declare a second ceiling as shown below:
XML
<element>
  <ceiling>
      <ceiling_1>
          <material>concrete</material>
          <insulating>cellular_plastic</insulating>
          <coating>paint</coating>
          <H>260</H>
      </ceiling_1>
          <ceiling_2>
          <material>concrete</material>
          <insulating>cellular_plastic</insulating>
          <coating>paint</coating>
          <H>210</H>
      </ceiling_2>
  </ceiling>
</element>
YAML
element:
  ceiling:
    ceiling_1:
      material: concrete
      insulating: cellular_plastic
      coating: paint
      H: 260.0
    ceiling_2:
      material: concrete
      insulating: cellular_plastic
      coating: paint
      H: 210.0
Floor
Similarly to the ceiling, according to the data available, we know that:
- The floors are made of concrete
- The floors are covered of glued tiling
The way we should introduce these elements in both XML and YAML formats is detailed below:
XML
<element>
  <floor>
      <floor_1>
          <material>concrete</material>
          <coating>glued_tiling</coating>
      </floor_1>
  </floor>
</element>
YAML
As with ceilings, if more than one type of floor is present in the dwelling, it should be declared independently.
Coverstrip
The data available shows that wooden coverstrips are present in floors. The way we should introduce these elements in both XML and YAML formats is detailed below:
XML
<element>
  <coverstrip>
      <coverstrip_1>
          <material>wood</material>
      </coverstrip_1>
  </coverstrip>
</element>
YAML
Wall
The data available shows that there are three different types of walls in our building:
- load bearing walls made of concrete with a single layer render
- painted lining walls with vegetal insulation
- painted partition wall made of placostil
The way we should introduce these elements in both XML and YAML formats is detailed below:
XML
<element>
  <wall>
      <load_bearing_wall_1>
          <wall_type>load_bearing_wall</wall_type>
          <material>concrete</material>
          <render>single_layer</render>
      </load_bearing_wall_1>
      <lining_1>
          <wall_type>lining</wall_type>
          <material>polyplac</material>
          <insulating>vegetal</insulating>
      </lining_1>
      <partition_1>
          <wall_type>partition</wall_type>
          <material>placostil</material>
      </partition_1>
  </wall>
</element>
YAML
element:
  wall:
    load_bearing_wall_1:
      wall_type: load_bearing_wall
      material: concrete
      render: single_layer
    lining_1:
      wall_type: lining
      material: polyplac
      insulating: vegetal
    partition_1:
      wall_type: partition
      material: placostil
Note that contrary to ceilings and floors, when declaring walls, only the renders are declared but not the coatings. They will be declared independently.
Coating
According to the data provided, there is only one coating: paint. The way we should introduce these elements in both XML and YAML formats is detailed below:
XML
YAML
Baseboard
Data also indicates that there are tile baseboards. Declare them as it is shown below:
XML
<element>
  <baseboard>
      <baseboard_1>
          <material>tiling</material>
          <width>30</width>
      </baseboard_1>
  </baseboard>
</element>
YAML
Opening
Last but not least, you must declare the openings. The data available shows that we have three different types of openings:
- the main door, which is a solid wooden door 2.3 meters high and 1.1 meters wide
- the interior doors, which are wooden-framed alveolar doors 2.05 meters high and 0.9 meters wide
- the PVC windows 1.1 meters high and 0.9 meters wide, with solid PVC shutters
You should declare these elements in both XML and YAML formats as shown below:
XML
<element>
  <opening>
      <door_ext>
          <opening_type>door</opening_type>
          <material>solid_wood</material>
          <height>230</height>
          <width>110</width>
      </door_ext>
      <door_int>
          <opening_type>door</opening_type>
          <material>alveolar_wood_frame</material>
          <height>205</height>
          <width>90</width>
      </door_int>
      <window_t1>
          <opening_type>window</opening_type>
          <material>pvc</material>
          <height>110</height>
          <width>90</width>
          <shutter>solid_pvc</shutter>
      </window_t1>
  </opening>
</element>
YAML
element:
  opening:
    door_ext:
      opening_type: door
      material: solid_wood
      height: 230.0
      width: 110.0
    door_int:
      opening_type: door
      material: alveolar_wood_frame
      height: 205.0
      width: 90.0
    window_t1:
      opening_type: window
      material: pvc
      height: 110.0
      width: 90.0
      shutter: solid_pvc
Overview of the element block
If we put all the elements together, your element block should look as follows:
XML
<element>
    <ceiling>
      <ceiling_1>
        <material>concrete</material>
        <insulating>cellular_plastic</insulating>
        <coating>paint</coating>
        <H>260</H>
      </ceiling_1>
    </ceiling>
  <floor>
    <floor_1>
      <material>concrete</material>
      <coating>glued_tiling</coating>
    </floor_1>
  </floor>
  <coverstrip>
    <coverstrip_1>
      <material>wood</material>
    </coverstrip_1>
  </coverstrip>
  <wall>
    <load_bearing_wall_1>
      <wall_type>load_bearing_wall</wall_type>
      <material>concrete</material>
      <render>single_layer</render>
    </load_bearing_wall_1>
    <lining_1>
      <wall_type>lining</wall_type>
      <material>polyplac</material>
      <insulating>vegetal</insulating>
  </lining_1>
    <partition_1>
      <wall_type>partition</wall_type>
      <material>placostil</material>
    </partition_1>
  </wall>
  <coating>
    <coating_1>
      <material>paint</material>
    </coating_1>
  </coating>
  <baseboard>
    <baseboard_1>
      <material>tiling</material>
      <width>30</width>
    </baseboard_1>
  </baseboard>
  <opening>
    <door_ext>
      <opening_type>door</opening_type>
      <material>solid_wood</material>
      <height>230</height>
      <width>110</width>
    </door_ext>
    <door_int>
      <opening_type>door</opening_type>
      <material>alveolar_wood_frame</material>
      <height>205</height>
      <width>90</width>
    </door_int>
    <window_t1>
      <opening_type>window</opening_type>
      <material>pvc</material>
      <height>110</height>
      <width>90</width>
      <shutter>solid_pvc</shutter>
    </window_t1>
  </opening>
</element>
YAML
element:
  ceiling:
    ceiling_1:
      material: concrete
      insulating: cellular_plastic
      coating: paint
      H: 260.0
  floor:
    floor_1:
      material: concrete
      coating: glued_tiling
  coverstrip:
    coverstrip_1:
      material: wood
  wall:
    load_bearing_wall_1:
      wall_type: load_bearing_wall
      material: concrete
      render: single_layer
    lining_1:
      wall_type: lining
      material: polyplac
      insulating: vegetal
    partition_1:
      wall_type: partition
      material: placostil
  coating:
    coating_1:
      material: paint
  baseboard:
    baseboard_1:
      material: tiling
      width: 30.0
  opening:
    door_ext:
      opening_type: door
      material: solid_wood
      height: 230.0
      width: 110.0
    door_int:
      opening_type: door
      material: alveolar_wood_frame
      height: 205.0
      width: 90.0
    window_t1:
      opening_type: window
      material: pvc
      height: 110.0
      width: 90.0
      shutter: solid_pvc
Step 4: declare the building block
Before you can declare the building block, there are some calculations that you should make on your building plan. These calculations correspond to the coordinates that each corner of both the building and the rooms would have in a plane.
Setting up coordinates
The following two sections will show you how you should proceed to determine the coordinates of your building. We will start with the exterior walls and openings, then the rooms.
Exterior walls
To determine your coordinates, you should use the following conventions:
- the origin of coordinates is always located at the bottom-left corner of the house/room
- to determine the coordinates of the rest of the corners you should proceed counter-clockwise
- the segment between two corners constitutes a wall. It should be labeled with a capital letter
- negative coordinates are allowed
The next two figures will show you a practical example of the
application of this conventions:
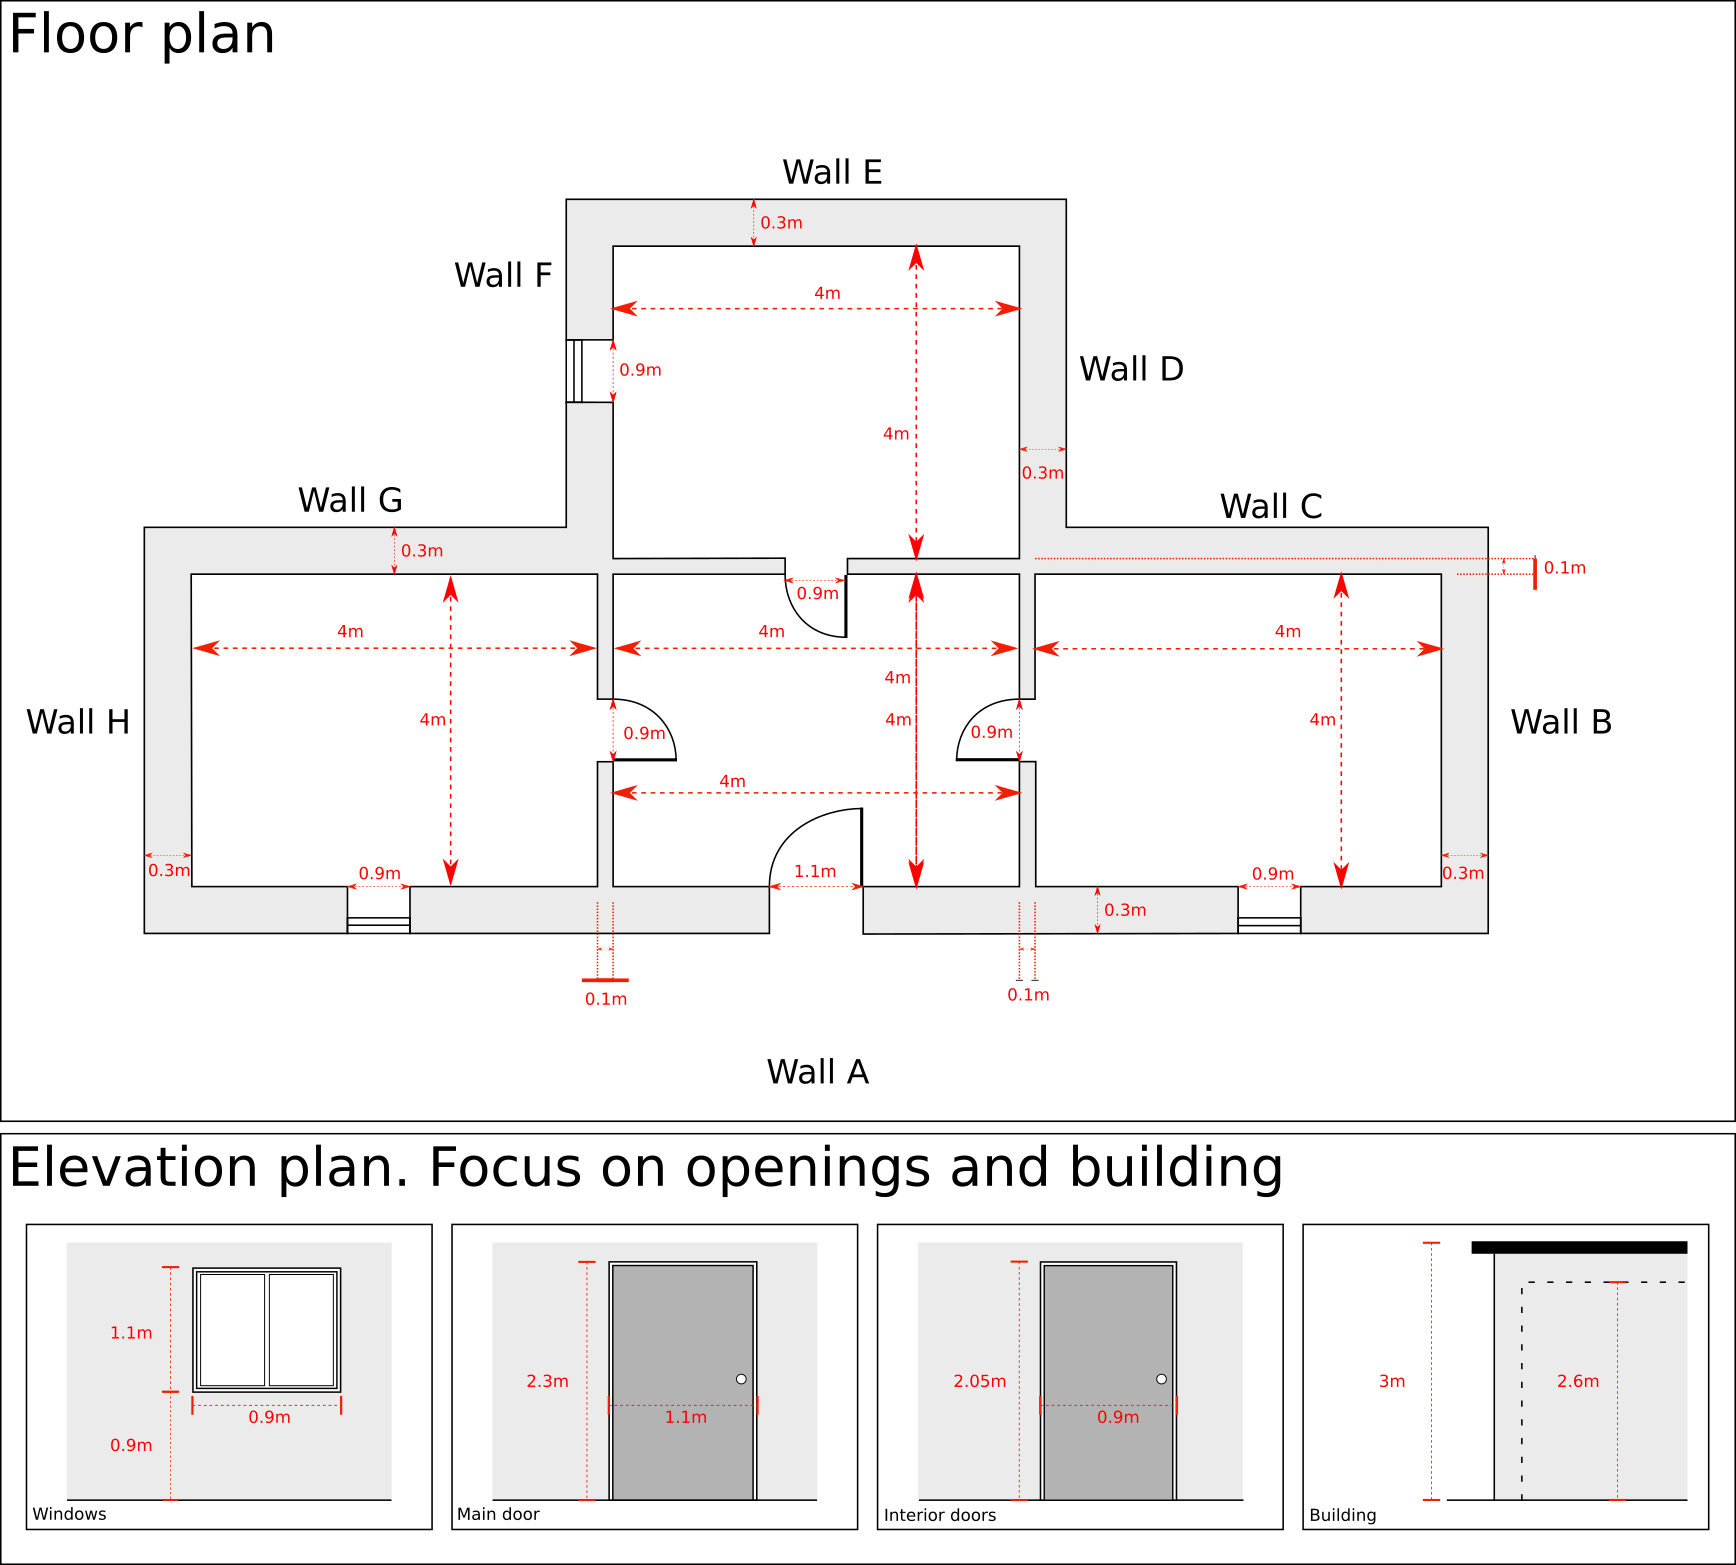
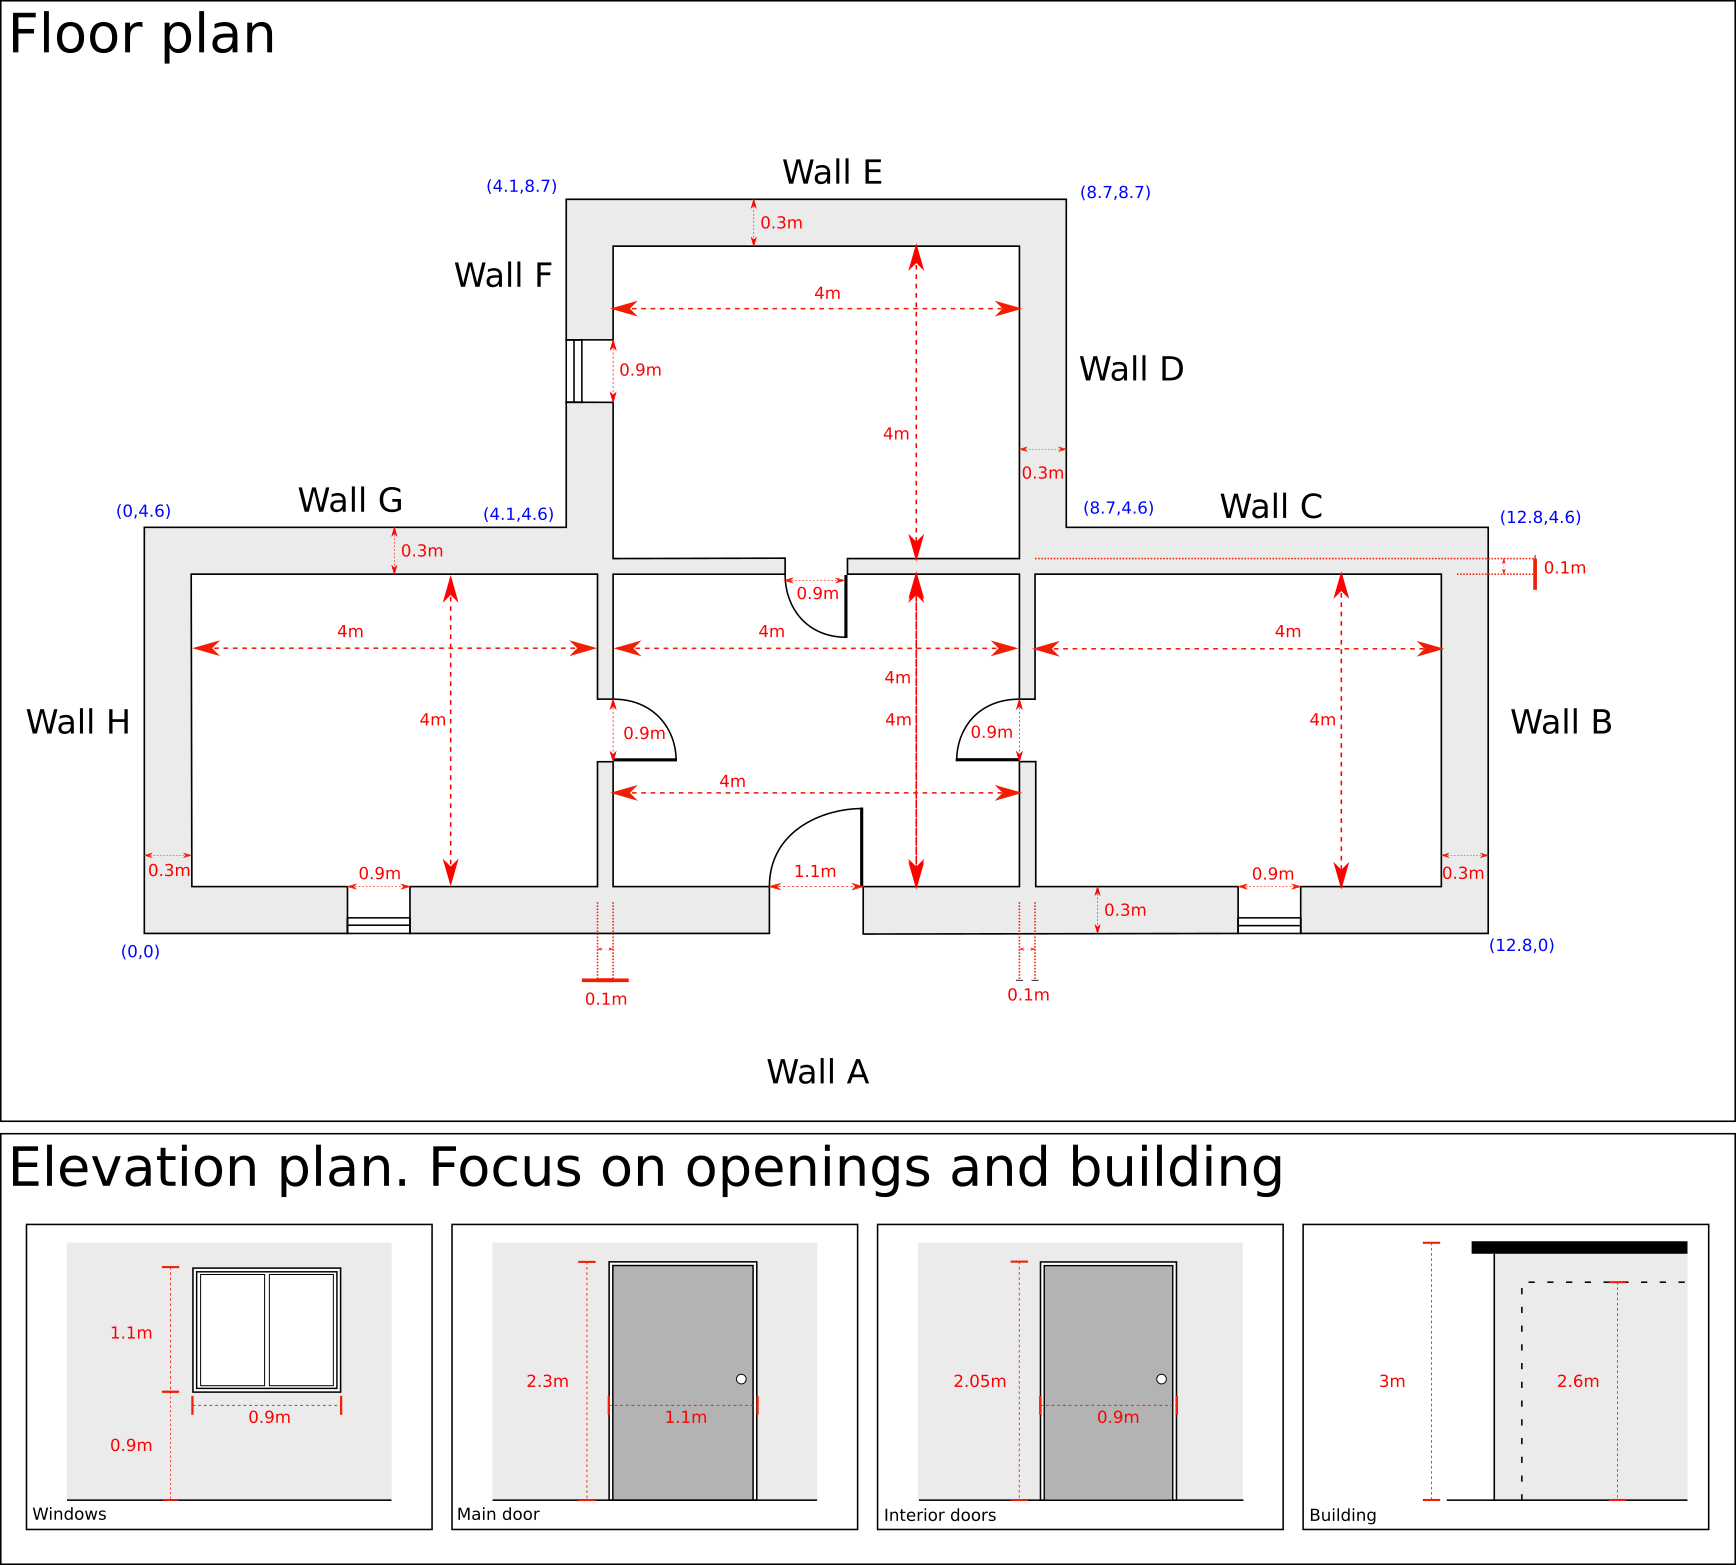
The calculations to determine the coordinates are
straightforward. Let us take the wall A as an example:
Step 1: the bottom-left corner of the building becomes the origin of coordinates → (0,0)
-
Step 2: proceeding counter-clockwise, the next coordinate is located in the bottom-right corner of the building. To determine the coordinate we know:
- that there are 3 rooms 4 meters wide
- that there are 2 walls 0.3 meter wide
- that there are two walls 0.1 meters wide
Step 3: aggregating these dimensions (3×4 + 2×0.3 + 2×0.1) we determine that the coordinate of the second corner is (12.8,0)
You are now ready to determine the rest of the coordinates of the corners of the exterior walls yourself!
The approach to calculate the coordinates of your openings is slightly different. Instead of providing the coordinate where the opening starts as you do in the case of walls, you should:
- declare each opening using the coordinate of the middle point of the opening width-wise.
- declare each opening using the coordinate of the middle point of the wall thickness-wise.
- identify each of your openings with a different label
Please the example on the plan below.
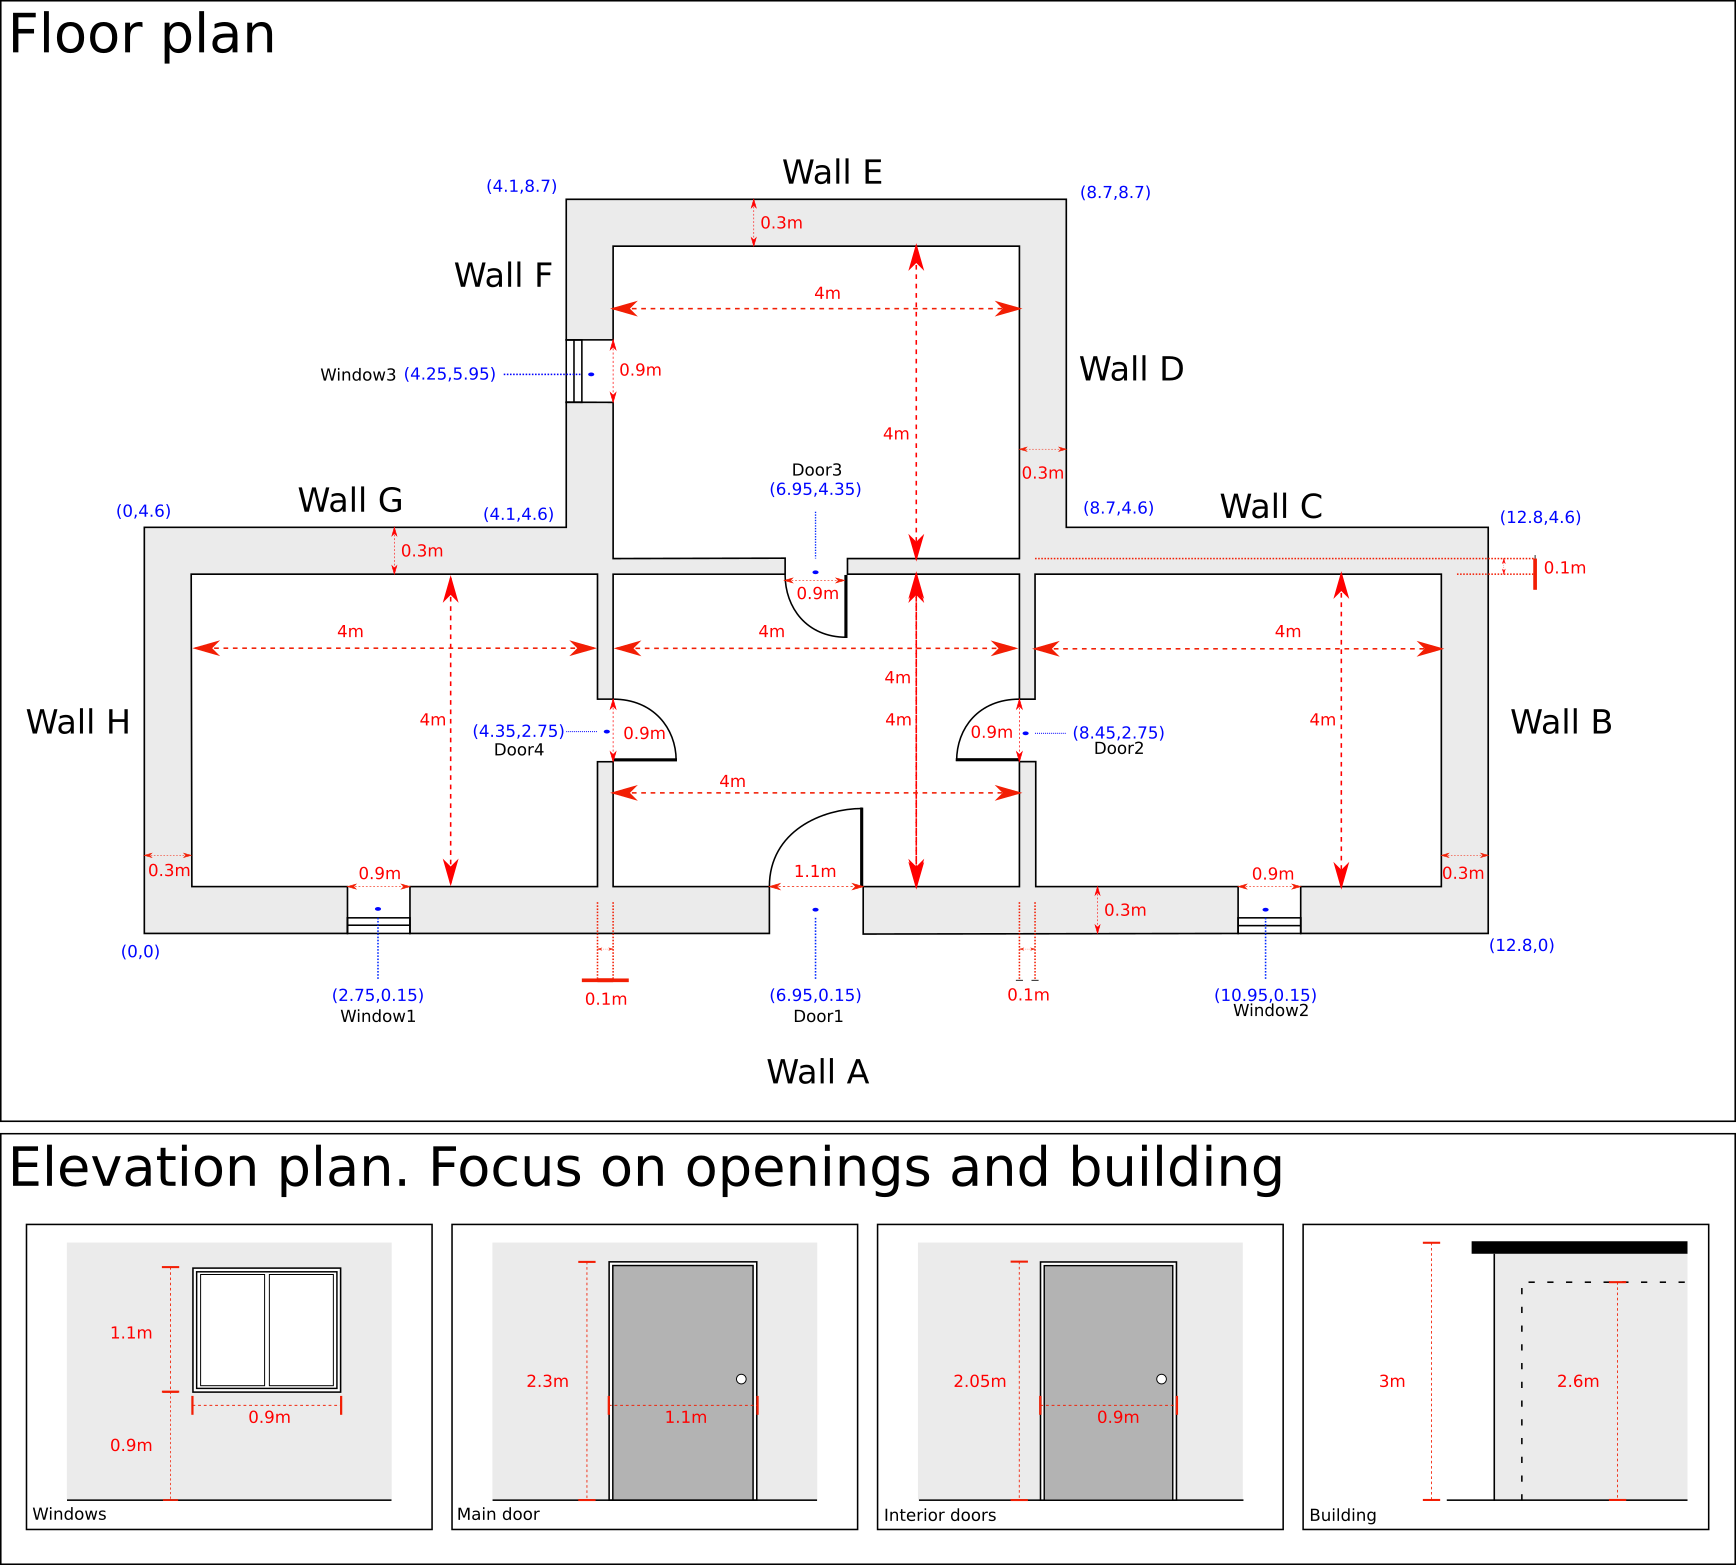
Rooms
Concerning the interior rooms, we proceed similarly as with exterior walls. You should follow the following conventions:
- Each room should be numbered: room_1, room_2, etc
- We strongly recommend you to label the room closest to the origin of coordinates ‘room_1’ and proceed with labels from left to right and from bottom to top
- Your starting point is always located at the bottom-left corner of the room
- to determine the coordinates of the rest of the corners you should proceed counter-clockwise
- the segment between two corners constitutes a wall. It should be labeled with a number
- negative coordinates are allowed
- openings must be declared when declaring the room. In other words, openings must be declared in both sides of a wall
In the figure below, you will find an example. As you can see, all rooms have been labeled following the convention (room_1, room2, etc). If we focus on the room_1, we see that:
- the bottom-left corner of the room is located at coordinates (0.3; 0.3). These coordinates correspond to the origin of coordinates plus 0.3 meters of wall thickness.
- the bottom-right corner of the room is located at coordinates (4.3; 0.3), i.e. 4 meters in the X-axis direction from the bottom-left corner of the room
- the opening (window1) is located at the same coordinates that we calculated above.
You are now ready to determine the rest of the coordinates of the corners of this room yourself!
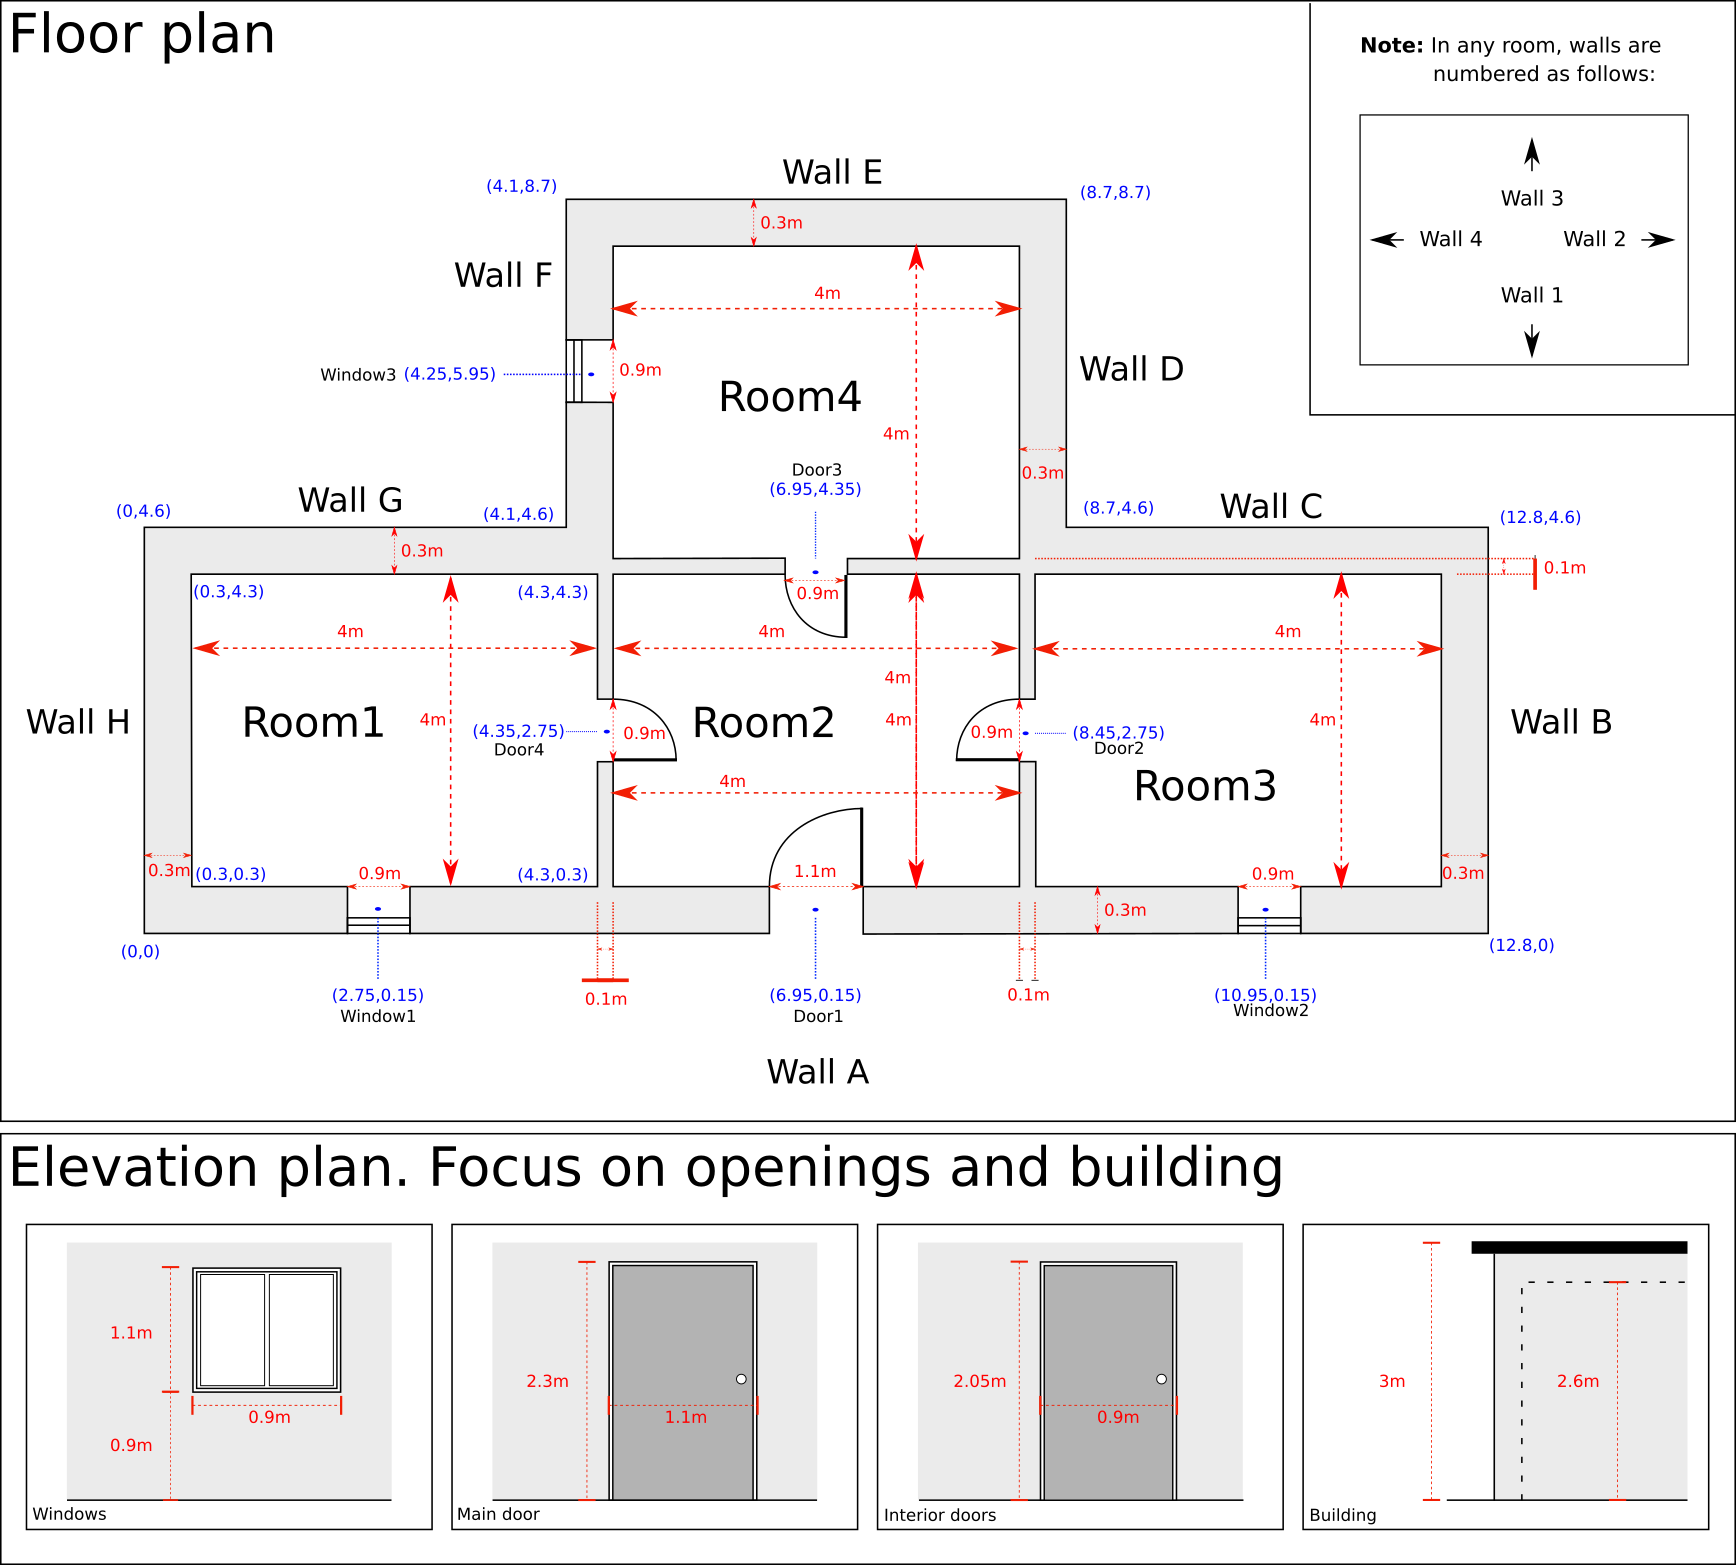
Applying the same conventions room by room you should arrive at the same solution as the floor plan shown below.
Declaring values
The building block should begin with the information related to the storey: height at which the storey is located, relative to the ground (H) and the name of the storey. Following this information we have the sub-blocks dedicated to external walls and rooms. Let us focus again on the exterior wall A and the room_1 to explain how the information should be declared to floodam.building.
In the case of the exterior wall A, you should provide:
- the initial coordinate of the wall (only the initial coordinate!)
- the type of the wall, using the label you provided to declare the specific element wall in the element block. In the case of the wall A, that would be load_bearing_wall_1
- Any optional feature accepted by the input file (see our vignette The structure of the input file of floodam.building)
- the openings found on the wall
For the openings, the declaration is very similar. You should provide:
- a name for the opening. We recommend you to use the same name you gave it in your map
- the coordinate of the opening (you should only have one per opening!)
- the type of the opening
- the height at which the opening is located (relative to base of the wall on which the opening is located)
Please see the examples in both XML and YAML provided below. Please be aware of the different treatment of openings in XML and YAML when several openings are included. As you can see in the code chunks below, the XML option does not need you to number the openings; YAML, on the other hand, will throw and error if you do not:
XML
  <building>
    <storey>
        <name>ground-floor</name>
        <H>0</H>
        <external>
          <wall_A>
              <coordinates>0,0</coordinates> <!--Initial x-y coordinate of the wall-->
              <type>load_bearing_wall_1</type>
              <opening>
                  <name>window1</name>
                  <coordinates>2.75,0.15</coordinates>
                  <type>window_t1</type>
                  <H>90</H> <!--height of the bottom border of the opening from the ground-->
              </opening>
              <opening>
                  <name>door1</name>
                  <coordinates>6.95,0.15</coordinates>
                  <type>door_ext</type>
                  <H>0</H> <!--height of the bottom border of the opening from the ground-->
              </opening>
              <opening>
                  <name>window2</name>
                  <coordinates>10.95,0.15</coordinates>
                  <type>window_t1</type>
                  <H>90</H> <!--height of the bottom border of the opening from the ground-->
              </opening>
          </wall_A>
          …

  </building>
YAML
building:
  storey:
    name:
    H: 0.0
    external:
      wall_A:
        coordinates:
        - 0.0
        - 0.0
        type: load_bearing_wall_1
        opening_1:
          name: window1
          coordinates:
          - 2.75
          - 0.15
          type: window_t1
          H: 90.0
        opening_2:
          name: door1
          coordinates:
          - 6.95
          - 0.15
          type: door_ext
          H: 0.0
        opening_3:
          name: window2
          coordinates:
          - 10.95
          - 0.15
          type: window_t1
          H: 90.0
      wall_B:
      …
In the case of the room_1, you should provide:
- the name of the room. You can provided the label “room_1” or you can be more explicit with the dwelling distribution and provide “bedroom”
- the floor, using the label you provided to declare the specific element floor in the element block. In this case that would be floor_1
- the ceiling, similarly as with the floor.
- the baseboard, similarly as with the ceiling or the floor.
- the height at which the room is located if it is different from the rest of the storey.
- Each of the walls that shape the room, using a similar procedure as
used in the declaration of external walls
- the initial coordinate of the wall (only the initial coordinate!)
- the type of the wall, using the label you provided to declare the specific element wall in the element block.
- optional elements, like coatings (see our vignette The structure of the input file of floodam.building)
- the openings found on the wall, using the same pattern as above. It is very important that, when you declare an opening you make sure that it is the same opening form both sides of the wall.
Please see the examples in both XML and YAML provided below:
XML
  <building>
          …
        <room_1>
          <name>room_1</name>
          <floor>floor_1</floor>
          <baseboard>baseboard_1</baseboard>
          <ceiling>ceiling_1</ceiling>
          <wall_1>
            <coordinates>0.3,0.3</coordinates>
            <type>lining_1</type>
            <coating>
              <type>coating_1</type>
            </coating>
            <opening>
              <name>window1</name>
              <coordinates>2.75,0.15</coordinates>
              <type>window_t1</type>
              <H>90</H>
            </opening>
          </wall_1>
          <wall_2>
            <coordinates>4.3,0.3</coordinates>
            <type>partition_1</type>
            <coating>
              <type>coating_1</type>
            </coating>
            <opening>
              <name>door4</name>
              <coordinates>4.35,2.75</coordinates>
              <type>door_int</type>
              <H>0</H>
            </opening>
          </wall_2>
          <wall_3>
            <coordinates>4.3,4.3</coordinates>
            <type>lining_1</type>
            <coating>
              <type>coating_1</type>
            </coating>
          </wall_3>
          <wall_4>
            <coordinates>0.3,4.3</coordinates>
            <type>lining_1</type>
            <coating>
              <type>coating_1</type>
            </coating>
          </wall_4>
        </room_1>
        …
</building>
YAML
building:

      …
    room_1:
      name: room_1
      floor: floor_1
      baseboard: baseboard_1
      ceiling: ceiling_1
      wall_1:
        coordinates:
        - 0.3
        - 0.3
        type: lining_1
        coating:
          type: coating_1
        opening_5:
          name: window1
          coordinates:
          - 2.75
          - 0.15
          type: window_t1
          H: 90.0
      wall_2:
        coordinates:
        - 4.3
        - 0.3
        type: partition_1
        coating:
          type: coating_1
        opening_6:
          name: door4
          coordinates:
          - 4.35
          - 2.75
          type: door_int
          H: 0.0
      wall_3:
        coordinates:
        - 4.3
        - 4.3
        type: lining_1
        coating:
          type: coating_1
      wall_4:
        coordinates:
        - 0.3
        - 4.3
        type: lining_1
        coating:
          type: coating_1
    …
You should now be able to create your own building file for this building. To help the learning process and be able to self-evaluate, you can access the XML and YAML finished versions of the building file here